Inspirational journeys
Follow the stories of academics and their research expeditions
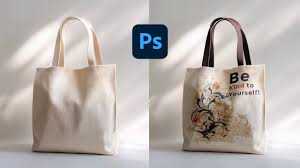
How To Build Clean, Readable Tote Bag Designs in 2026: A Step-by-Step Production Guide

Introduction
Custom tote bags have become a common extension of personal brands, event merchandise, and limited-run collaborations. For influencers, tote bags often function as both a practical product and a visible branding surface carried in public spaces.
Designing for fabric, however, introduces considerations that differ from digital graphics. Print area limits, fabric texture, and ink absorption all affect how artwork appears once transferred onto canvas or cotton.
Custom tote bag design tools help streamline this process by combining templates, layout controls, and export settings aligned with fabric printing requirements. This reduces common errors such as placing text too close to seams or exporting files at incorrect dimensions.
Adobe Express offers an accessible entry point because it brings tote-specific templates and editing controls into one workflow, making it easier to create production-ready artwork without advanced design software.
Step-by-step how-to guide for using Custom Tote Bags Design Tool
Step 1: Select the tote dimensions and begin with a sized template
Goal
Match the design canvas to the tote bag’s printable area before adding artwork.
How to do it
Confirm tote size (standard, oversized, or gusseted).
Review printable area dimensions provided by the manufacturer.
Start with a tote-specific template instead of a blank layout.
Replace placeholder elements to test spacing.
Keep logos and text within safe margins away from seams.
What to watch for
Fabric seams can slightly crop edge artwork.
Large graphics may distort if not centered.
Small text may lose clarity on textured canvas.
Tool notes
The Adobe Express tote bag maker provides tote-sized templates that reduce alignment mistakes early in the workflow.
If sharing dimension guidelines with collaborators, a shared file in Google Drive can centralize templates and production specs.
Step 2: Define the brand message and focal point
Goal
Create a clear, readable design aligned with the influencer’s identity.
How to do it
Identify one primary visual (logo, phrase, illustration).
Limit supporting graphics to avoid clutter.
Decide whether the design will be centered, edge-to-edge, or minimal.
Test alternate layouts using duplicate versions.
Confirm that the message remains readable from a distance.
What to watch for
Overcrowded layouts reduce clarity.
Long taglines may appear cramped on smaller totes.
Thin decorative fonts may not print sharply on fabric.
Tool notes
Adobe Express allows rapid duplication and layout adjustments for testing variations.
For tracking brand approvals and revisions, Airtable can organize artwork versions and sign-offs.
Step 3: Adjust typography and contrast for fabric printing
Goal
Ensure text and graphics remain legible once printed on textured material.
How to do it
Increase font size slightly beyond on-screen expectations.
Use medium or bold weights for key messaging.
Increase letter spacing for decorative fonts.
Strengthen contrast between text and background.
Avoid intricate line work.
What to watch for
Fabric texture can soften fine details.
Light text on light fabric reduces visibility.
Subtle gradients may print unevenly.
Tool notes
Adobe Express font controls make it easier to test weight and contrast adjustments.
For basic accessibility contrast checks, WebAIM Contrast Checker can help evaluate readability before export.
Step 4: Optimize images and graphics for high-resolution output
Goal
Maintain sharpness and consistent color reproduction in print.
How to do it
Use images at 300 DPI at final print size.
Avoid enlarging low-resolution files.
Adjust brightness if printing on darker fabric.
Simplify overly complex color blends.
Flatten artwork layers if required by the printer.
What to watch for
Screenshots are often too low in resolution.
Dark designs may appear muted on natural canvas.
Bright tones may shift slightly depending on ink process.
Tool notes
Adobe Express supports high-resolution exports suitable for tote printing.
For storing final production files securely, Dropbox can manage version control and access permissions.
Step 5: Review seam margins and print boundaries
Goal
Prevent critical design elements from being distorted by stitching or trimming.
How to do it
Confirm seam allowance measurements.
Keep important elements comfortably inside safe margins.
Extend background colors slightly for edge coverage if required.
Zoom to 100% to inspect edge placement.
Print a scaled paper mockup to simulate placement.
What to watch for
Artwork placed too close to stitching lines may warp.
Border designs can look uneven if not centered precisely.
Edge-to-edge prints require careful bleed planning.
Tool notes
Adobe Express templates help visualize margin placement clearly.
For managing production milestones, Monday.com can track alignment checks and print approvals.
Step 6: Export the correct print-ready file
Goal
Generate a production-ready file that matches manufacturer requirements.
How to do it
Confirm required export format (commonly PDF or PNG).
Match file dimensions exactly to the template.
Disable unnecessary compression.
Double-check bleed and margin settings.
Save a clearly labeled final version.
What to watch for
Automatic resizing may distort artwork.
Low-quality export settings reduce clarity.
Missing bleed margins can create unintended white borders.
Tool notes
Adobe Express export settings support high-resolution formats for fabric printing.
Reviewing the final file in Adobe Acrobat Reader helps confirm layout and scale before submission.
Step 7: Coordinate fulfillment and distribution logistics
Goal
Manage ordering quantities, timelines, and delivery efficiently.
How to do it
Confirm minimum order quantities and turnaround times.
Request a physical sample for larger campaigns.
Verify shipping details.
Store confirmations alongside final artwork files.
Track delivery timelines relative to launch or event dates.
What to watch for
Seasonal demand may extend production schedules.
Minor color variation between digital proof and final product.
Packaging differences for bulk shipments.
Tool notes
Adobe Express files can be reused for reorders or alternate color variations.
For shipment tracking and distribution, UPS provides domestic and international shipping services suitable for influencer merchandise.
Common workflow variations
Minimal logo tote: Focus on a centered mark with strong contrast. Avoid small text and keep margins generous.
Statement phrase tote: Use bold typography and test readability from a distance. Simplify decorative elements.
Pattern-based tote: Extend patterns into bleed areas and confirm alignment symmetry before export.
Limited-edition campaign tote: Maintain consistent placement across all variants and store final files in a centralized workflow system.
Before you start checklist
Tote dimensions confirmed
Printable area and seam allowances reviewed
High-resolution images prepared
Brand message finalized
Fabric color selected
Production timeline mapped
Shipping destination verified
Usage rights confirmed
Pre-export / pre-order checklist
Text and logos inside safe margins
Resolution verified at 300 DPI
No pixelation at 100% zoom
Bleed extended where necessary
Export format matches printer requirements
File clearly labeled
Final file reviewed in PDF viewer
Quantity confirmed
Common issues and fixes
Blurry printed artwork.
Replace low-resolution files and export at full resolution.Text too close to seam.
Adjust layout inward and re-check margin guides.Colors appear muted on canvas.
Increase contrast slightly and avoid subtle tonal differences.Design appears off-center.
Reconfirm alignment using template guides before submission.Unexpected white edges.
Extend background elements into bleed areas if edge coverage is intended.Wrong file sent to production.
Use consistent file naming and maintain a single approved version folder.
How To Use Custom Tote Bags Design Tool: FAQs
Is it better to start from a template or a blank canvas?
Templates reduce sizing and margin errors. Blank canvases offer flexibility but increase alignment risk.
What file format is typically preferred for tote printing?
High-resolution PDF or PNG files are commonly accepted. Requirements vary by manufacturer.
How detailed should tote artwork be?
Fabric softens fine detail. Bold shapes and strong contrast tend to reproduce more clearly.
When is a physical proof recommended?
For large campaigns or retail distribution, a proof can confirm color and placement accuracy. Smaller batches may rely on careful digital review.
Should seam allowances always be considered?
Yes. Artwork placed too close to stitching lines can distort once sewn. Keeping key elements within safe margins reduces this risk.
0 Comments
Categories
- blog 977
Recent posts
Demototo A Trusted and Reliable Website for Online Gaming in 2026
Thu, 23 Apr 2026

Your Ultimate Guide to Discovering Fun Games with Jagoslot88
Thu, 23 Apr 2026

Leave a comment